Pro Se Filer Events
Certificate of Credit Counseling
Updated 11/17/2020
Step 1 - PDF Requirement
CM/ECF will accept only PDF documents. Make sure you have a PDF version of the certificate saved on your computer.
Step 2 - Login to CM/ECF
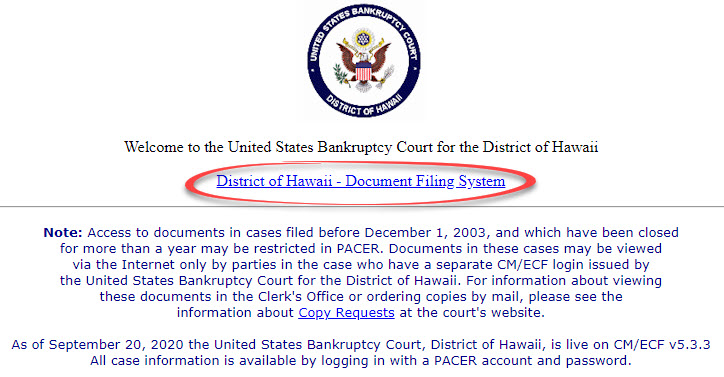
- Go to https://ecf.hib.uscourts.gov/
- Click on District of Hawaii - Document Filing System
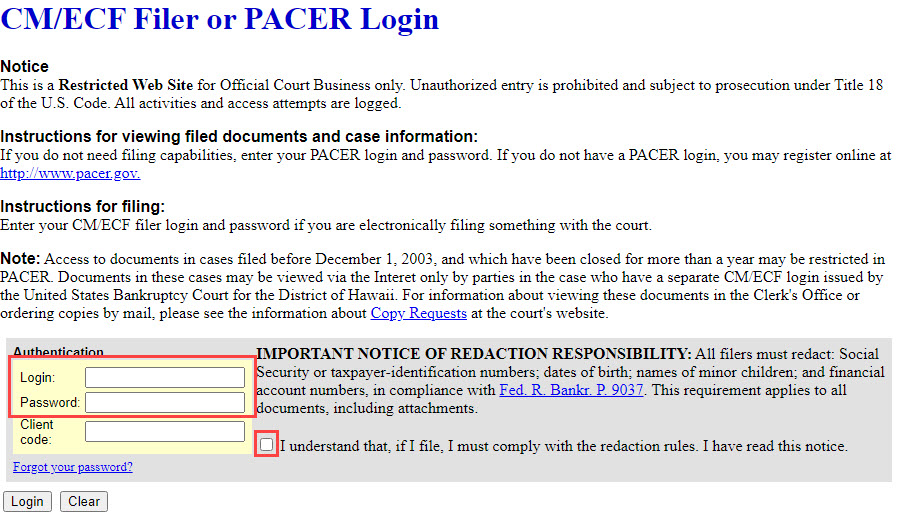
- At the login screen, enter your Login and Password, and read the Important Notice of Redaction Responsibility. Check the box to confirm you understand it and click Login.
Step 3 - File Certificate
- Select Bankruptcy from the blue main menu bar. Then select Pro Se Events.
- Enter the Case Number. Click Next.
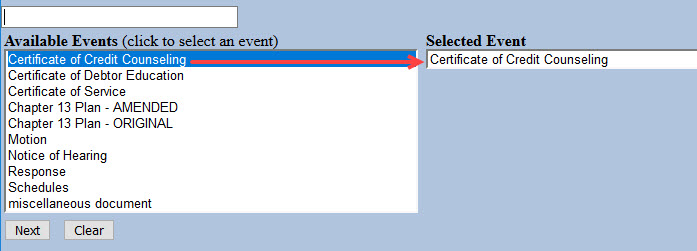
- A list of available events displays. Select Certificate of Credit Counseling. It will display on the right, in the Selected Event box. Click Next.
- The next screen gives you an option to select attorneys. Do not make a selection. Click Next. Click OK at the Note that you have not selected an attorney.

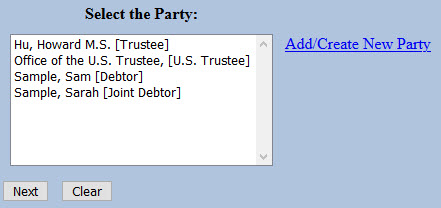
- A list of case participants displays. Your name should already be listed. Select it and click Next.
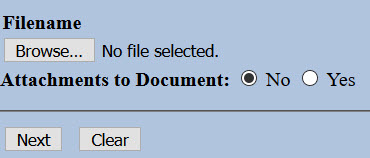
- Click Choose File or Browse and attach the PDF of your certificate. Click Next when done.

You should always view your document to ensure you are selecting the correct one. To view it, browse to the desired PDF document and right-click the file name. Select Open and the file will open for viewing.
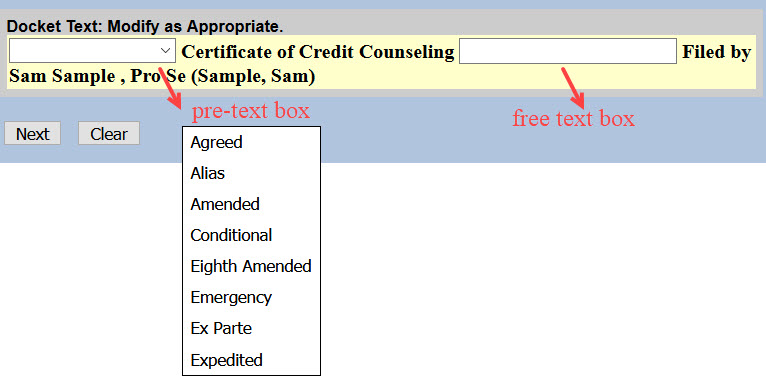
- The docket text displays, allowing additional information. If appropriate, select a pre-text option and/or type titles of additional documents attached in the free text box. Click Next.
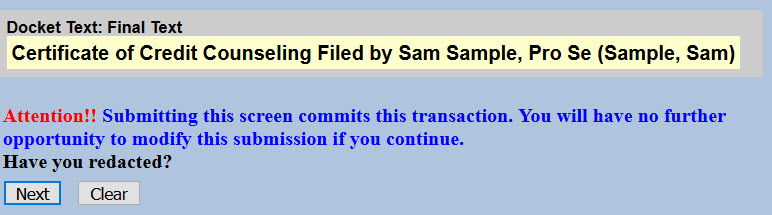
- The final docket text displays. This is your final opportunity to modify your filing. Carefully review the docket entry. If you need to make a change, use your browser's back button to return to the appropriate screen. If correct, click Next to submit.
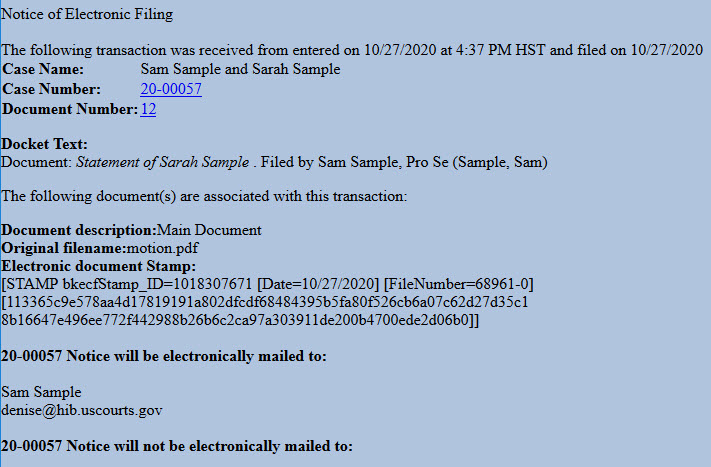
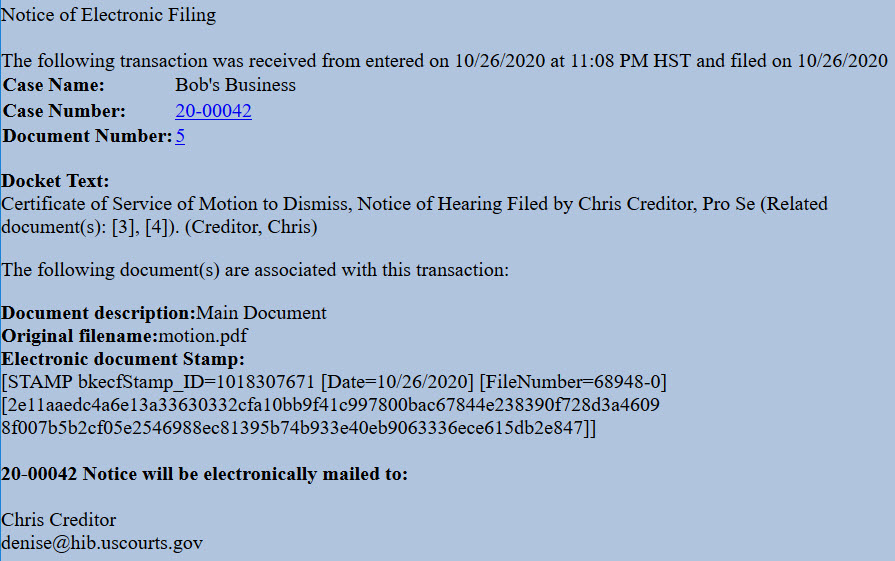
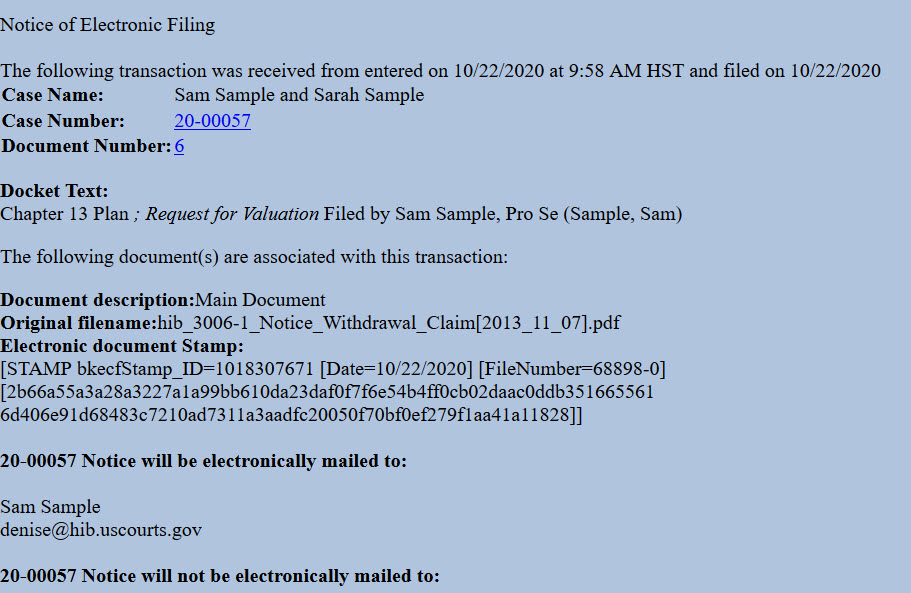
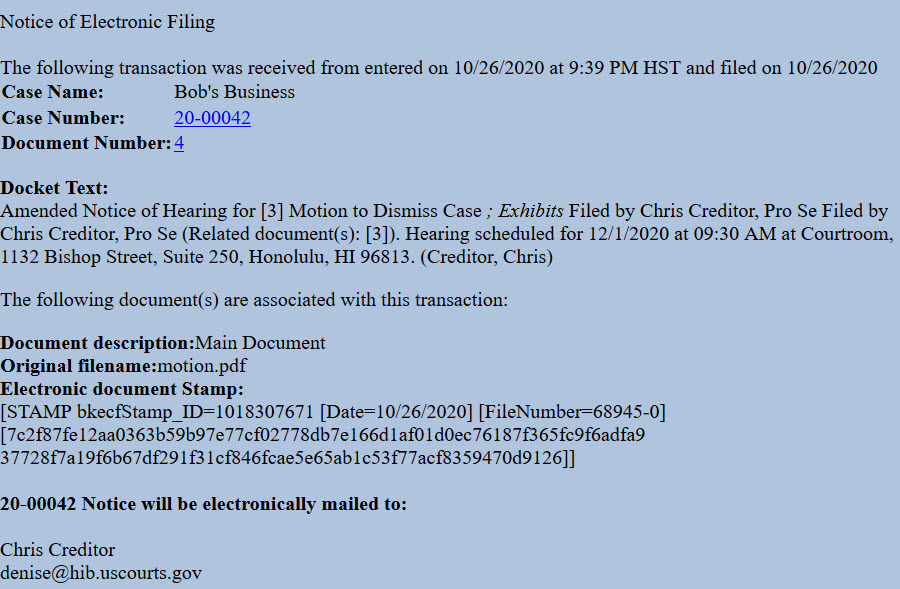
- The Notice of Electronic Filing (NEF) displays. It is confirmation of the filing in the court's database. The NEF is emailed to the registered parties in the case and includes the text of the docket entry, the unique electronic document stamp, a list of the case participants receiving e-mail notification of the filing, and a hyperlink to the document(s) filed.

Certificate of Debtor Education
Updated 11/18/2020
Step 1 - PDF Requirement
CM/ECF will accept only PDF documents. Make sure you have a PDF version of the certificate saved on your computer.
Step 2 - Login to CM/ECF
- Go to https://ecf.hib.uscourts.gov/
- Click on District of Hawaii - Document Filing System
- At the login screen, enter your Login and Password, and read the Important Notice of Redaction Responsibility. Check the box to confirm you understand it and click Login.
Step 3 - File Certificate
- Select Bankruptcy from the blue main menu bar and then select Pro Se Events.
- Enter the Case Number. Click Next.
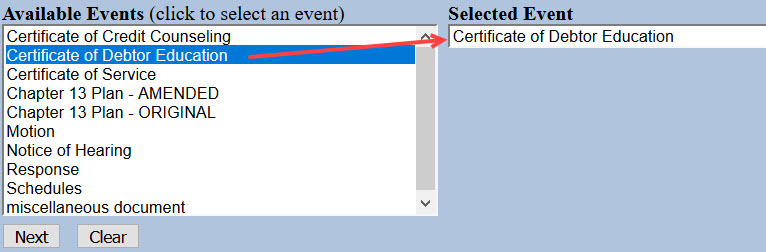
- A list of available events displays. Select Certificate of Debtor Education. It will display on the right, in the Selected Event box. Click Next.
- The next screen gives you an option to select attorneys. Do not make a selection. Click Next. Click OK at the Note that you have not selected an attorney.
- A list of case participants displays. Your name should already be listed. Select it and click Next.
- Click Choose File or Browse and attach the PDF of your certificate. Click Next when done.
You should always view your document to ensure you are selecting the correct one. To view it, browse to the desired PDF document and right-click the file name. Select Open and the file will open for viewing.
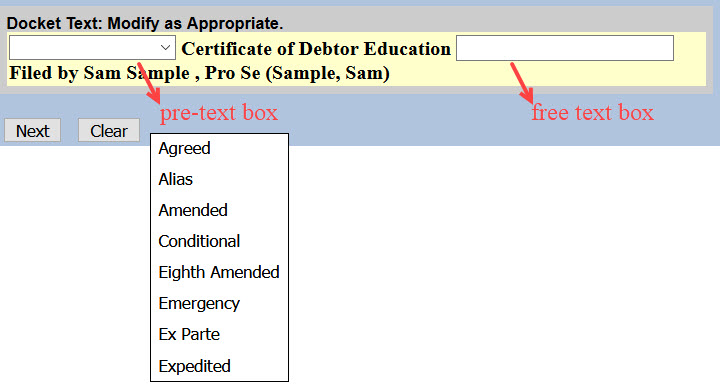
- The docket text displays, allowing additional information. If appropriate, select a pre-text option and/or type titles of additional documents attached in the free text box. Click Next.
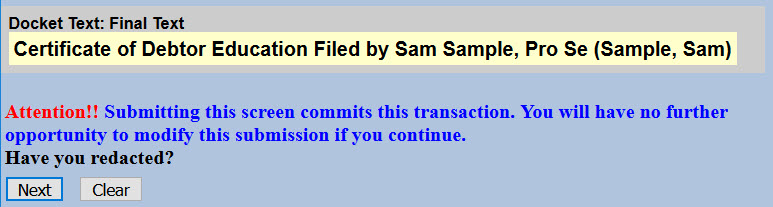
- The final docket text displays. This is your final opportunity to modify your filing. Carefully review the docket entry. If you need to make a change, use your browser's back button to return to the appropriate screen. If correct, click Next to submit.
- The Notice of Electronic Filing (NEF) displays. It is confirmation of the filing in the court's database. The NEF is emailed to the registered parties in the case and includes the text of the docket entry, the unique electronic document stamp, a list of the case participants receiving e-mail notification of the filing, and a hyperlink to the document(s) filed.

Certificate of Service
Updated 11/18/2020
General Information
Bankruptcy rules may require you to serve the document you filed with the court on other parties.
Step 1 - Prepare Certificate of Service
Complete the appropriate form:
Certificate of Service (H9013-3A) (for adversary proceedings)
Certificate of Service (H9013-3B) (for bankruptcy cases)
Step 2 - Sign Document
Sign the certificate or type your name on the signature line.
Step 3 - Scan Document or Print to PDF
CM/ECF will accept only PDF documents. Make sure you have a PDF version of the certificate saved on your computer.
Step 4 - Login to CM/ECF
- Go to https://ecf.hib.uscourts.gov/
- Click on District of Hawaii - Document Filing System
- At the login screen, enter your Login and Password, and read the Important Notice of Redaction Responsibility. Check the box to confirm you understand it and click Login.
Step 5 - File Certificate of Service
- Select Bankruptcy or Adversary from the blue main menu bar and then select Pro Se Events.
- Enter the Case Number. Click Next.
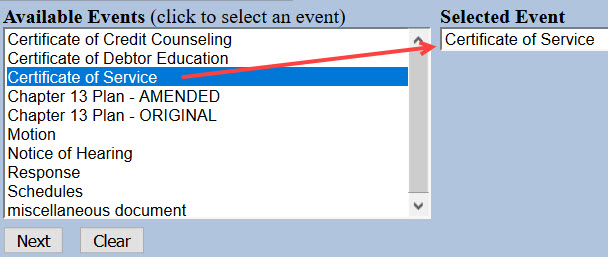
- A list of available events displays. Select Certificate of Service. It will display on the right, in the Selected Event box. Click Next.
- The next screen gives you the option to select attorneys. Do not make a selection. Click Next. Click OK at the Note that you have not selected an attorney.
- A list of case participants displays. Your name should already be listed. Select it and click Next.
- Click Choose File or Browse and attach the PDF of your certificate. Click Next when done.
You should always view your document to ensure you are selecting the correct one. To view it, browse to the desired PDF document and right-click the file name. Select Open and the file will open for viewing.
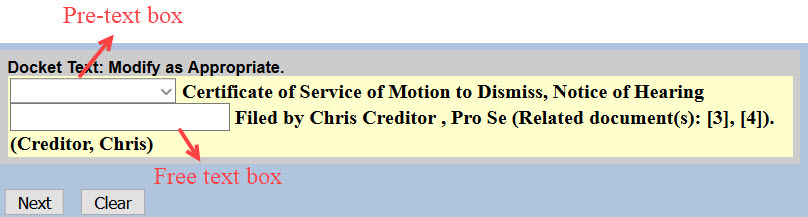
- Type the titles of documents served. For example, if you served a motion and notice of hearing on other parties, type that in the box. Click Next when done.

- An instructional message displays. Read it carefully and click Next.

- Select all categories. Left-click "answer" and drag to the bottom of the list. Click Next.

- A list of all documents filed in the case displays. Check the box(es) for the document(s) served. For example, if you served the Motion to Dismiss and Amended Notice of Hearing, check the boxes for "3" and "4".

- The docket text displays, allowing additional information. If appropriate, select a pre-text option and/or type titles of additional documents attached in the free text box. Click Next.
- The final docket text displays. This is your final opportunity to modify your filing. Carefully review the docket entry. If you need to make a change, use your browser's back button to return to the appropriate screen. If correct, click Next to submit.

- The Notice of Electronic Filing (NEF) displays. It is confirmation of the filing in the court's database. The NEF is emailed to the registered parties in the case and includes the text of the docket entry, the unique electronic document stamp, a list of the case participants receiving e-mail notification of the filing, and a hyperlink to the document(s) filed.
Chapter 13 Plan - ORIGINAL
Updated 4/19/2021
General Information
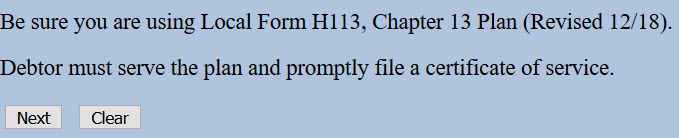
The chapter 13 plan must be filed within 14 days of case filing and must substantially conform to the local Chapter 13 Plan. Review Local Bankruptcy Rule 3015-1 for important information on the plan, including service requirements.
Request to Value Collateral to Determine Amount of Secured Claim. If the plan includes a request to value the collateral of a non-governmental unit under § 506(a) or a governmental unit under Bankruptcy Rule 3012(c), the plan must include Attachment A: Addendum to Section 4.5 Request for Valuation of Secured Claim.
Request to Avoid a Lien. If the plan includes a request to avoid a lien under § 522(f), the plan must include Attachment B: Addendum to Section 4.7 Request to Avoid Lien.
Step 1 - Prepare Chapter 13 Plan and Any Attachments
Chapter 13 Plan (H113)
Attachment A: Addendum to Section 4.5 Request for Valuation of Secured Claim (H113_ExA)
Attachment B: Addendum to Section 4.7 Request to Avoid Lien (H113_ExB)
Include Attachments A and B only if they apply to your situation.
Step 2 - Sign Document
Sign the plan or type your name on the signature line.
Step 3 - Scan Document or Print to PDF
CM/ECF will accept only PDF documents. Make sure you have a PDF version of the plan and any attachments saved on your computer.
Step 4 - Login to CM/ECF
- Go to https://ecf.hib.uscourts.gov/
- Click on District of Hawaii - Document Filing System
- At the login screen, enter your Login and Password, and read the Important Notice of Redaction Responsibility. Check the box to confirm you understand it and click Login.
Step 5 - File Plan
- After logging in, select Bankruptcy from the blue main menu bar and then select Pro Se Events.
- Enter the Case Number. Click Next.
- A list of available events displays. Select Chapter 13 Plan - ORIGINAL. It will display on the right, in the Selected Event box. Click Next.

- The next screen gives you an option to select additional attorneys. Do not make a selection. Click Next. Click OK at the Note that you have not selected an attorney.
- A list of case participants displays. Your name should already be listed. Select it and click Next.
- Click Choose File or Browse and attach the PDF of your plan. Click Next when done.
You should always view your document to ensure you are selecting the correct one. To view it, browse to the desired PDF document and right-click the file name. Select Open and the file will open for viewing.
- A reminder message displays. Read it carefully and click Next.
- The docket text displays, allowing additional information. If appropriate, type titles of additional documents attached in the free text box. Click Next.

For example, if you are attaching a Request for Valuation, type that in the box.

- The final docket text displays. This is your final opportunity to modify your filing. Carefully review the docket entry. If you need to make a change, use your browser's back button to return to the appropriate screen. If correct, click Next to submit.

- The Notice of Electronic Filing (NEF) displays. It is confirmation of the filing in the court's database. The NEF is emailed to the registered parties in the case and includes the text of the docket entry, the unique electronic document stamp, a list of the case participants receiving e-mail notification of the filing, and a hyperlink to the document(s) filed.
Chapter 13 Plan - AMENDED
Updated 4/19/2021
General Information
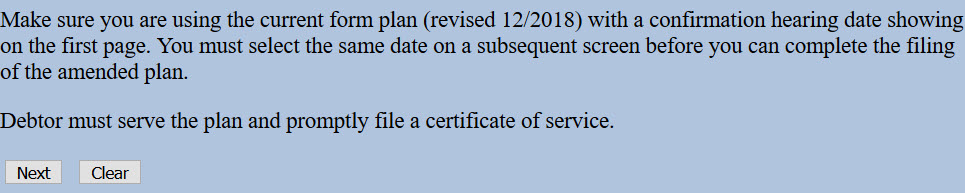
The debtor may file an amended chapter 13 plan anytime before confirmation by filing and serving on all creditors an Amended Chapter 13 Plan. The debtor must check the box labeled "Amended" and complete confirmation hearing information before filing and serving. Review Local Bankruptcy Rule 3015-1 and 3015-2 for important information on the plan, including service requirements.
Step 1 - Obtain Hearing Date
The court uses a "self-calendaring" system, so you do not need to contact the courtroom deputy to obtain the confirmation hearing date for your amended plan. You will need to login to CM/ECF to check for available dates.
Login to CM/ECF
- Go to https://ecf.hib.uscourts.gov/
- Click on District of Hawaii - Document Filing System
- Enter your Login and Password, and read the Important Notice of Redaction Responsibility. Check the box to confirm you understand it and click Login.
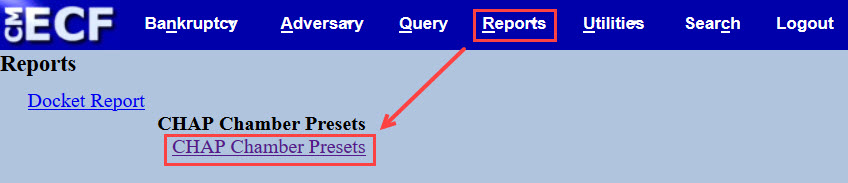
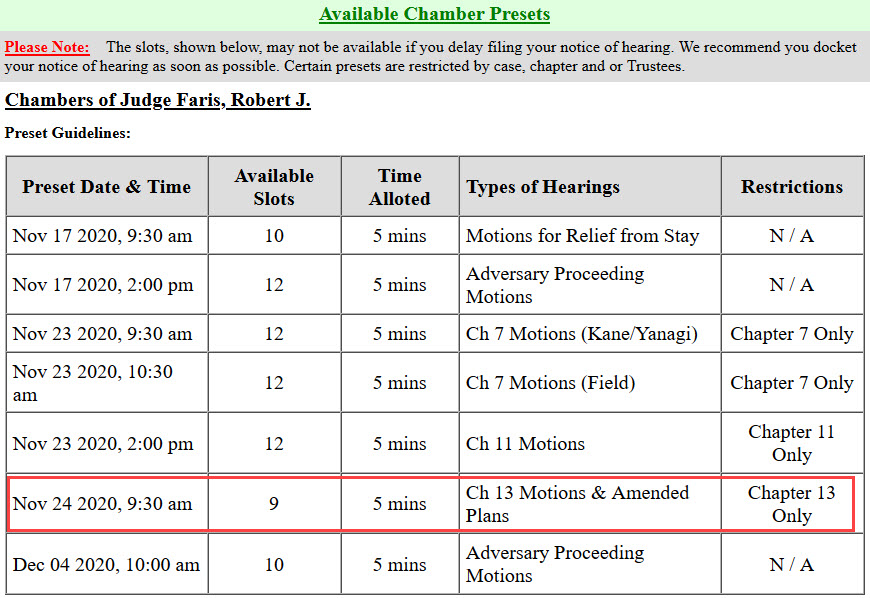
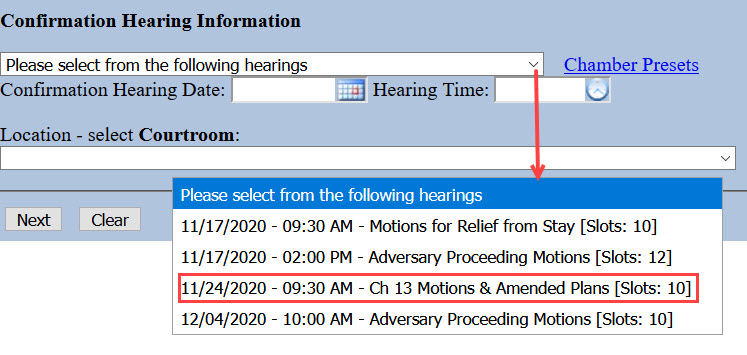
- Click on CHAP Chamber Presets in the Reports Menu.
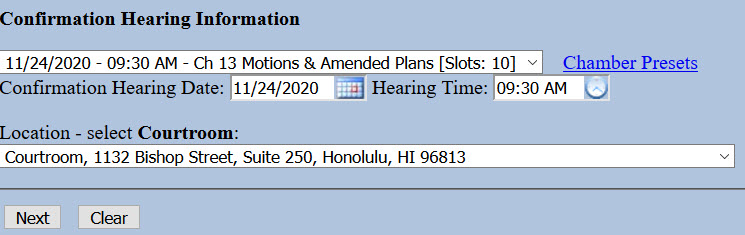
- When the report displays, look for the hearing type of Ch 13 Motions & Amended Plans. Note the hearing date and time. You will need to include that information on the first page of your amended plan.
Example
Step 2 - Prepare Amended Chapter 13 Plan and Any Attachments
Chapter 13 Plan (H113)
Attachment A: Addendum to Section 4.5 Request for Valuation of Secured Claim (H113_ExA)
Attachment B: Addendum to Section 4.7 Request to Avoid Lien (H113_ExB)
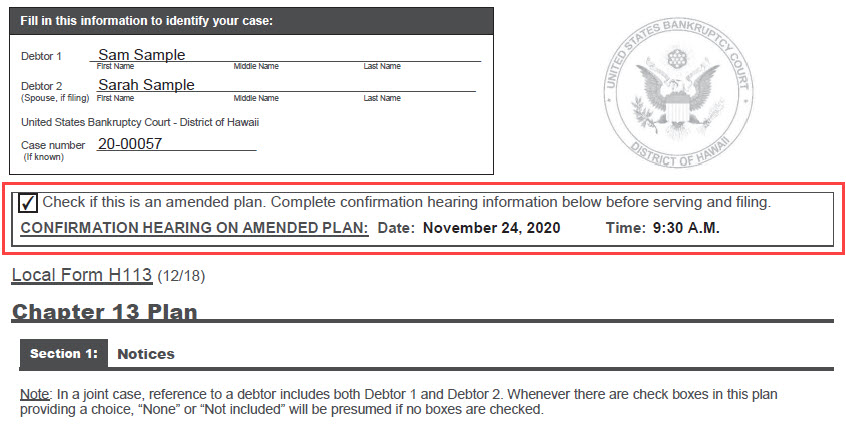
Check the "Amended" box and enter the confirmation hearing date and time from the CHAP Chambers Presets Report you obtained in Step 1 above. Include Attachments A and B only if they apply to your situation.
Step 3 - Sign Document
Sign the plan or type your name on the signature line.
Step 4 - Scan Document or Print to PDF
CM/ECF will accept only PDF documents. Make sure you have a PDF version of the amended plan and any attachments saved on your computer.
Step 5 - File Amended Plan
- After logging in to CM/ECF, select Bankruptcy from the blue main menu bar and then select Pro Se Events.
- Enter the Case Number. Click Next.
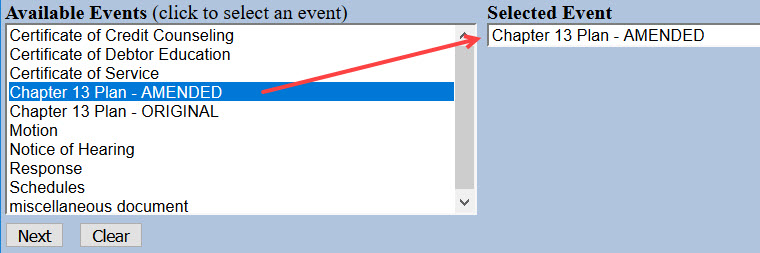
- A list of available events displays. Select Chapter 13 Plan - AMENDED. It will display on the right, in the Selected Event box. Click Next.
- The next screen gives you an option to select attorneys. Do not make a selection. Click Next. Click OK at the Note that you have not selected an attorney.
- A list of case participants displays. Your name should already be listed. Select it and click Next.
- Click Choose File or Browse and attach the PDF of your amended plan. Click Next when done.
You should always view your document to ensure you are selecting the correct one. To view it, browse to the desired PDF document and right-click the file name. Select Open and the file will open for viewing.
- A reminder message displays. Read it carefully and click Next.
- The hearing information screen displays. Click the drop-down arrow and select the appropriate hearing. Make sure it is the same hearing and date time on your form. Click Next.
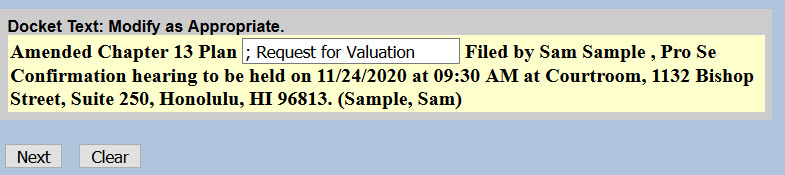
- The docket text displays, allowing additional information. If appropriate, type titles of additional documents attached in the free text box. Click Next.
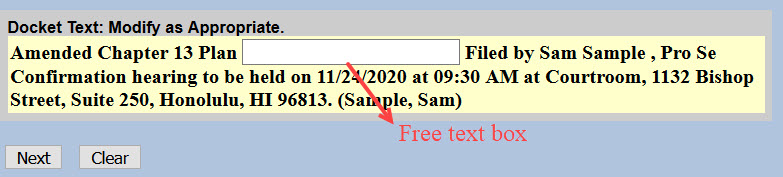
For example, if you are attaching a Request for Valuation, type that in the box.
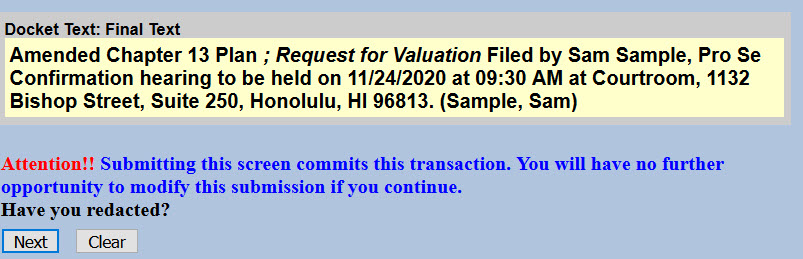
- The final docket text displays. This is your final opportunity to modify your filing. Carefully review the docket entry. If you need to make a change, use your browser's back button to return to the appropriate screen. If correct, click Next to submit.
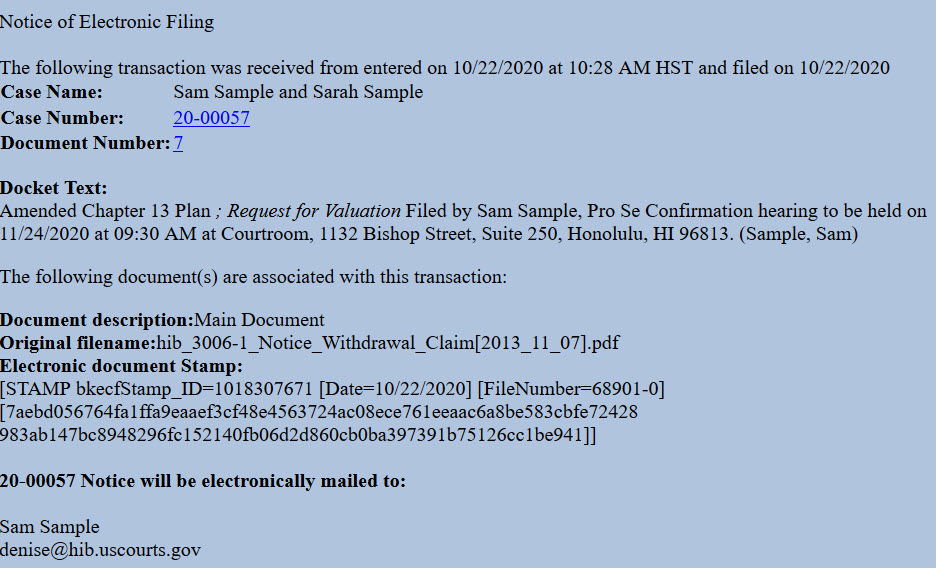
- The Notice of Electronic Filing (NEF) displays. It is confirmation of the filing in the court's database. The NEF is emailed to the registered parties in the case and includes the text of the docket entry, the unique electronic document stamp, a list of the case participants receiving e-mail notification of the filing, and a hyperlink to the document(s) filed.
Motion
Updated 11/18/2020
Step 1 - Prepare Motion
When preparing your motion, be sure to include:
- Your name, address and contact information;
- The case name and number;
- Title of your motion; and
- Explanation of the relief sought (i.e., what you are asking the court to do).
You may also choose to use the bankruptcy caption form or adversary proceeding caption form.
Step 2 - Sign Document
Sign your motion or type your name on the signature line of the caption form.
Step 3 - Scan Document or Print to PDF
CM/ECF will accept only PDF documents. Make sure you have a PDF version of your document saved on your computer.
Step 4 - Login to CM/ECF
- Go to https://ecf.hib.uscourts.gov/
- Click on District of Hawaii - Document Filing System
- At the login screen, enter your Login and Password, and read the Important Notice of Redaction Responsibility. Check the box to confirm you understand it and click Login.
Step 5 - File Motion
- Select Bankruptcy or Adversary from the blue main menu bar and then select Pro Se Events.
- Enter the Case Number.Click Next.
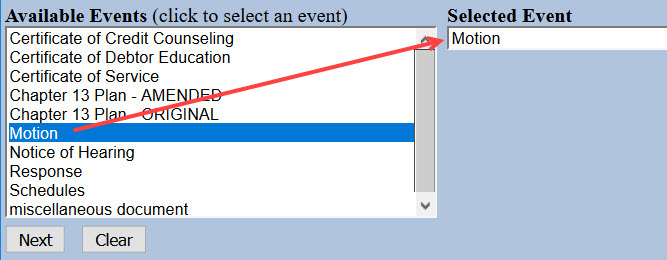
- A list of available events displays. Select Motion. It will display on the right, in the Selected Event box. Click Next.
- The next screen gives you the option to select attorneys. Do not make a selection. Click Next. Click OK at the Note that you have not selected an attorney.
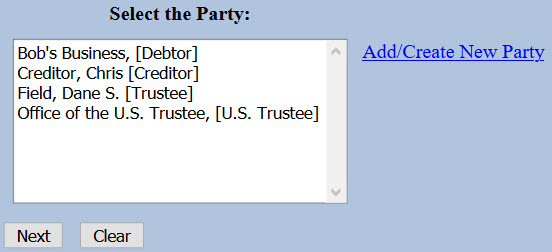
- A list of case participants displays. Your name should already be listed. Select it and click Next. If your name is not listed, click Add/Create New Party and view instructions on adding a new party to the case.

- Click Choose File or Browse and attach the PDF of your motion. Click Next when done.
You should always view your document to ensure you are selecting the correct one. To view it, browse to the desired PDF document and right-click the file name. Select Open and the file will open for viewing.
- In the box, describe your motion.

For example:

- The docket text displays, allowing additional information. If appropriate, select a pre-text option and/or type titles of additional documents attached in the free text box. Click Next.
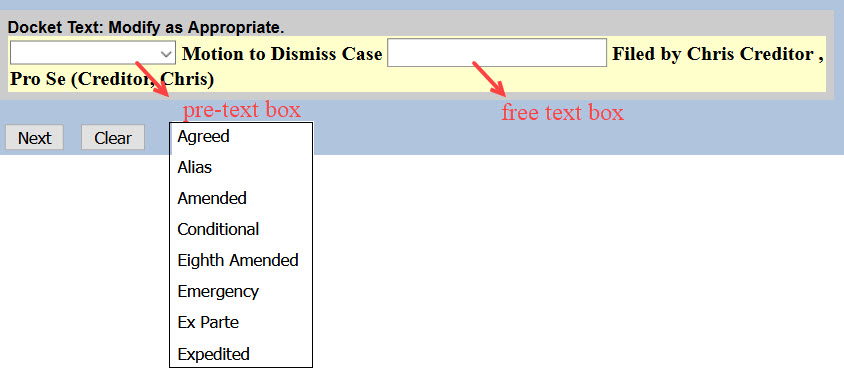
For example, if you are attaching exhibits, type Exhibits in the free text box.

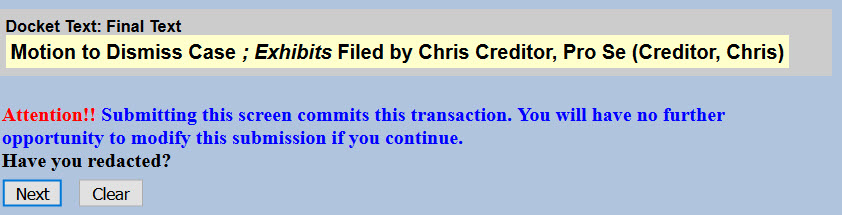
- The final docket text displays. This is your final opportunity to modify your filing. Carefully review the docket entry. If you need to make a change, use your browser's back button to return to the appropriate screen. If correct, click Next to submit.
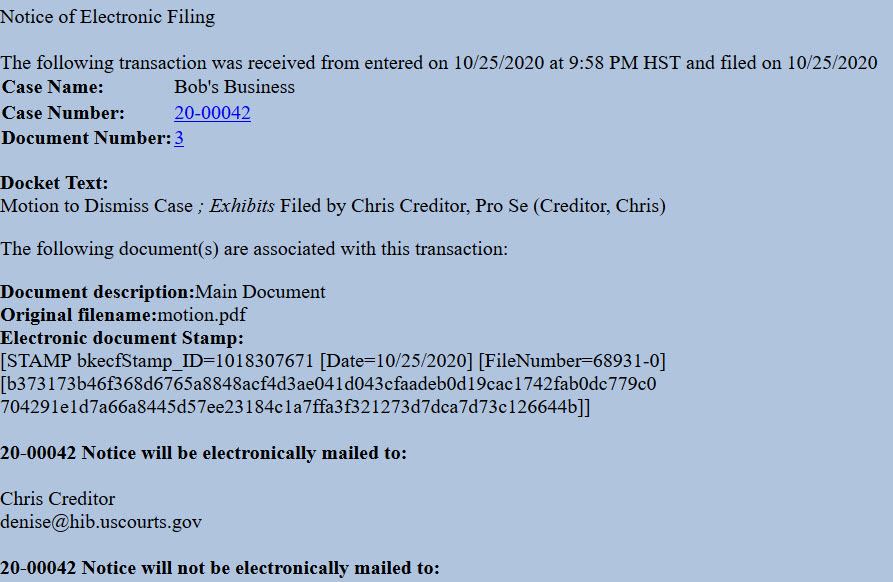
- The Notice of Electronic Filing (NEF) displays. It is confirmation of the filing in the court's database. The NEF is emailed to the registered parties in the case and includes the text of the docket entry, the unique electronic document stamp, a list of the case participants receiving e-mail notification of the filing, and a hyperlink to the document(s) filed.
Notice of Hearing
Updated 11/29/2021
General Information
If you filed a motion that must be set for hearing, you may be contacted by the court to file a document that notifies other parties of when the hearing will be held and where it will take place. Effective December 1, 2021, all hearings will be held by Zoom audio. The notice must include the connection and call-in information.
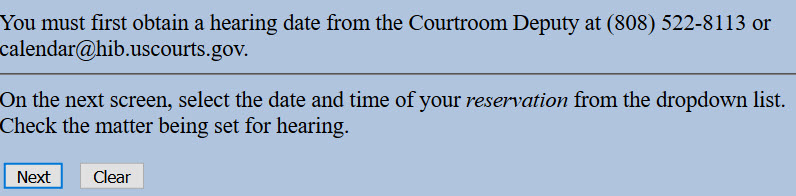
Step 1 - Obtain Hearing Date
The courtroom deputy will provide you with a hearing date and time, and will create a "reservation" for you in the court's calendaring program.
Step 2 - Prepare Notice of Hearing
Complete the Notice of Hearing (H9073-1). Be sure to enter the same hearing date and time provided by the courtroom deputy.
Step 3 - Sign Document
Sign the notice or type your name on the signature line.
Step 4 - Scan Document or Print to PDF
CM/ECF will accept only PDF documents. Make sure you have a PDF version of the hearing notice saved on your computer.
Step 5 - Login to CM/ECF
- Go to https://ecf.hib.uscourts.gov/
- Click on District of Hawaii - Document Filing System
- At the login screen, enter your Login and Password, and read the Important Notice of Redaction Responsibility. Check the box to confirm you understand it and click Login.
Step 6 - File Notice of Hearing
- Select Bankruptcy or Adversary from the blue main menu bar and then select Pro Se Events.
- Enter the Case Number. Click Next.
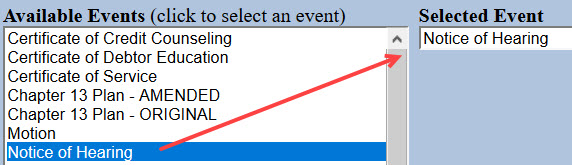
- A list of available events displays. Select Notice of Hearing. It will display on the right, in the Selected Event box. Click Next.
- The next screen gives you the option to select attorneys Do not make a selection. Click Next. Click OK at the Note that you have not selected an attorney.
- A list of case participants displays. Your name should already be listed. Select it and click Next.
- Click Choose File or Browse and attach the PDF of your notice. Click Next when done.
You should always view your document to ensure you are selecting the correct one. To view it, browse to the desired PDF document and right-click the file name. Select Open and the file will open for viewing.
- An important message displays. Read it carefully and click Next.
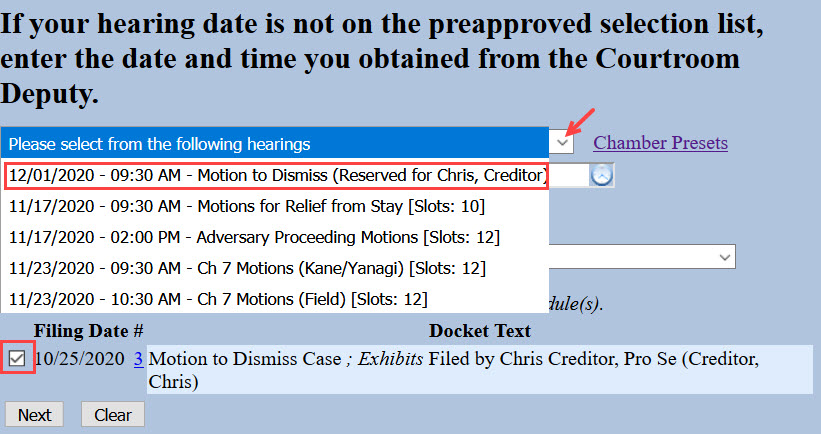
- The hearing information screen displays. Click the drop-down arrow, select your reservation and check the box for the matter being heard. Make sure the reservation is the same hearing date and time on your form. Click Next.
- The docket text displays, allowing additional information. If appropriate, select a pre-text option and/or type titles of additional documents attached in the free text box. Click Next.

For example, if you are filing an amended notice, select Amended from the pre-text box.

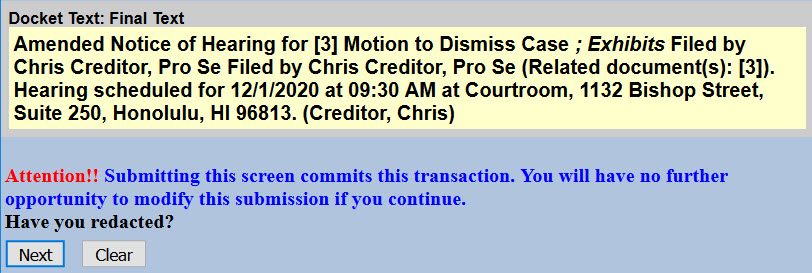
- The final docket text displays. This is your final opportunity to modify your filing. Carefully review the docket entry. If you need to make a change, use your browser's back button to return to the appropriate screen. If correct, click Next to submit.
- The Notice of Electronic Filing (NEF) displays. It is confirmation of the filing in the court's database. The NEF is emailed to the registered parties in the case and includes the text of the docket entry, the unique electronic document stamp, a list of the case participants receiving e-mail notification of the filing, and a hyperlink to the document(s) filed.
Response
Updated 11/18/2020
Step 1 - Prepare Response
When preparing your response, be sure to include:
- Your name, address and contact information;
- The case name and number;
- Title of your document;
- Details of your response (i.e., whether you agree or disagree, and why)
You may also choose to use the bankruptcy caption form or adversary proceeding caption form.
Step 2 - Sign Document
Sign your document or type your name on the signature line of the caption form.
Step 3 - Scan Document or Print to PDF
CM/ECF will accept only PDF documents. Make sure you have a PDF version of the response saved on your computer.
Step 4 - Login to CM/ECF
- Go to https://ecf.hib.uscourts.gov/
- Click on District of Hawaii - Document Filing System
- At the login screen, enter your Login and Password, and read the Important Notice of Redaction Responsibility. Check the box to confirm you understand it and click Login.
Step 5 - File Response
- Select Bankruptcy or Adversary from the blue main menu bar and then select Pro Se Events.
- Enter the Case Number. Click Next.
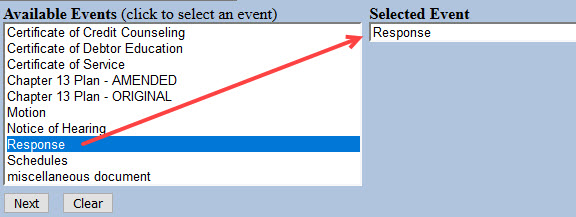
- A list of available events displays. Select Response. It will display on the right, in the Selected Event box. Click Next.
- The next screen gives you the option to select attorneys. Do not make a selection. Click Next. Click OK at the Note that you have not selected an attorney.
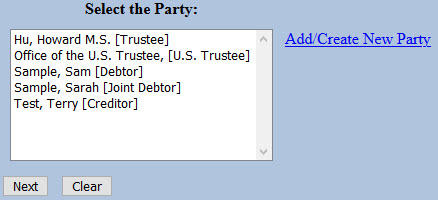
- A list of case participants displays. Your name should already be listed. Select it and click Next.
- Click Choose File or Browse and attach the PDF of your notice. Click Next when done.
You should always view your document to ensure you are selecting the correct one. To view it, browse to the desired PDF document and right-click the file name. Select Open and the file will open for viewing.
- Type the title of your response. Click Next when done.

For example, if you are opposing a motion to dismiss, type that in the box.

- An instructional message displays. Read it carefully and click Next.

- Select all categories. Left-click "answer" and drag to the bottom of the list. Click Next.
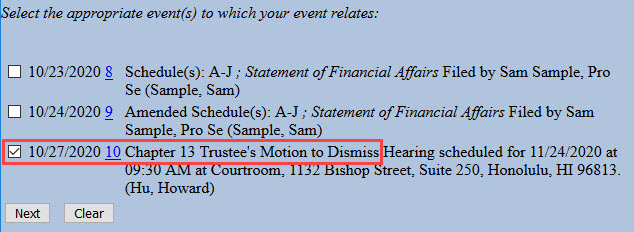
- Check the box(es) for the document to which you are responding. For example, if you are opposing the motion to dismiss, check the box for "10".
- The docket text displays, allowing additional information. If appropriate, select a pre-text option and/or type titles of additional documents attached in the free text box. Click Next.
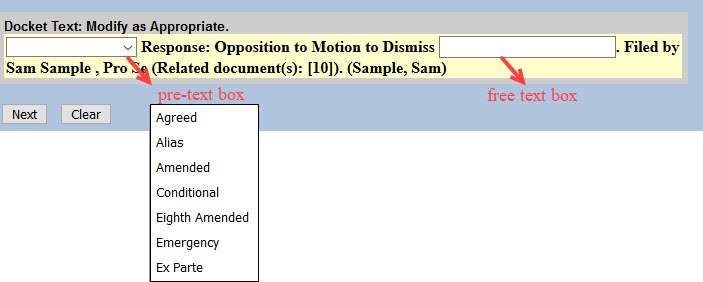
For example, if you are attaching exhibits, type that it the box.

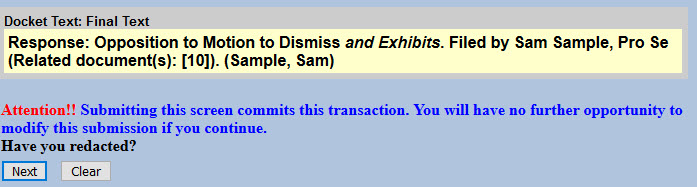
- The final docket text displays. This is your final opportunity to modify your filing. Carefully review the docket entry. If you need to make a change, use your browser's back button to return to the appropriate screen. If correct, click Next to submit.
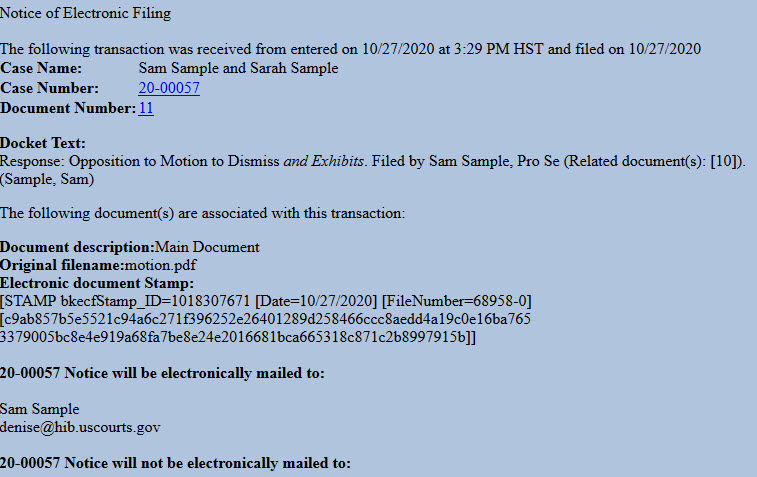
- The Notice of Electronic Filing (NEF) displays. It is confirmation of the filing in the court's database. The NEF is emailed to the registered parties in the case and includes the text of the docket entry, the unique electronic document stamp, a list of the case participants receiving e-mail notification of the filing, and a hyperlink to the document(s) filed.
Schedules
Updated 10/20/20
Step 1 - Prepare Schedules
Complete schedules, attaching Declaration About an Individual Debtor's Schedules (Official Form 106Dec) as the last page. Be sure to sign or type your name on the signature line of the declaration.
Step 2 - PDF Requirement
CM/ECF will accept only PDF documents. Make sure you have a PDF version of your schedules saved on your computer.
Step 3 - Login to CM/ECF
- Go to https://ecf.hib.uscourts.gov/
- Click on District of Hawaii - Document Filing System
- At the login screen, enter your Login and Password, and read the Important Notice of Redaction Responsibility. Check the box to confirm you understand it and click Login.
Step 4 - File Schedules
- Select Bankruptcy from the blue main menu bar and then select Pro Se Events.
- Enter the Case Number. Click Next.
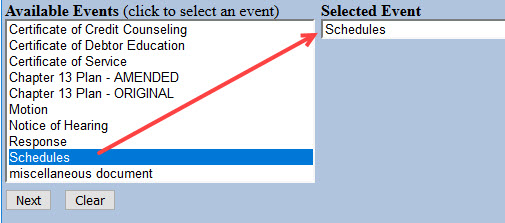
- A list of available events displays. Select Schedules. It will display on the right, in the Selected Event box. Click Next.
- The next screen gives you the option to select attorneys. Do not make a selection. Click Next. Click OK at the Note that you have not selected an attorney.
- A list of case participants displays. Your name should already be listed. Select it and click Next.
- If you are filing amended schedules D or E/F, or filing initial schedules that adds new creditors, a filing fee is due. Click Next when done reading the message.

- Click Choose File or Browse and attach the PDF of your documents. Click Next when done.
You should always view your document to ensure you are selecting the correct one. To view it, browse to the desired PDF document and right-click the file name. Select Open and the file will open for viewing.
- In the box, enter the schedules you are filing.

- The docket text displays, allowing additional information. If appropriate, select a pre-text option and/or type titles of additional documents attached in the free text box. Click Next.
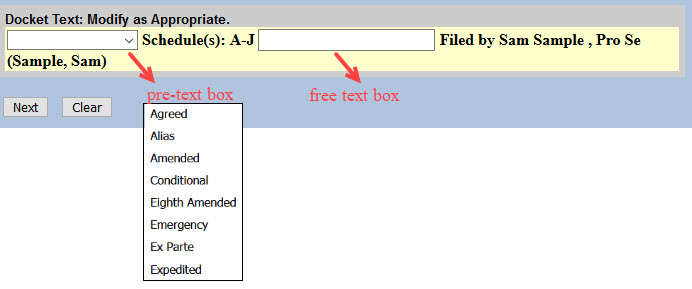
For example, if you are filing amended schedules and attaching the Statement of Financial Affairs, select Amended from the pre-text box and type Statement of Financial Affairs in the free text box.

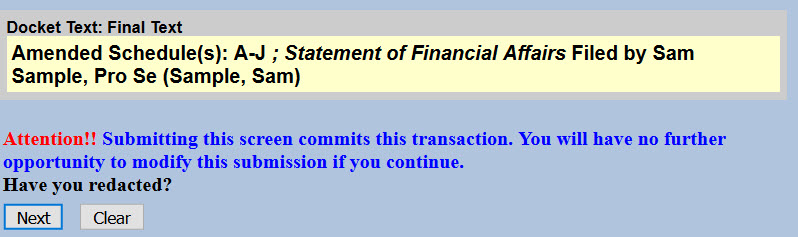
- The final docket text displays. This is your final opportunity to modify your filing. Carefully review the docket entry. If you need to make a change, use your browser's back button to return to the appropriate screen. If correct, click Next to submit.
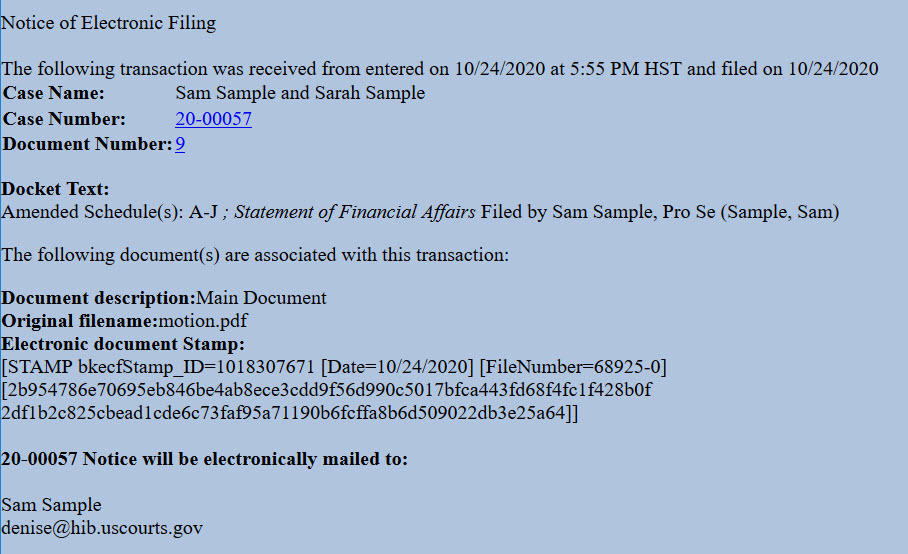
- The Notice of Electronic Filing (NEF) displays. It is confirmation of the filing in the court's database. The NEF is emailed to the registered parties in the case and includes the text of the docket entry, the unique electronic document stamp, a list of the case participants receiving e-mail notification of the filing, and a hyperlink to the document(s) filed.
miscellaneous document
Updated 11/18/2020
Step 1 - Prepare Document
When preparing your document, be sure to include:
- Your name, address and contact information;
- The case name and number; and
- Title of your document.
You may also choose to use the bankruptcy caption form or adversary proceeding caption form.
Step 2 - Sign Document
Be sure to sign the document or type your name on the signature line of the caption form.
Step 3 - Scan Document or Print to PDF
CM/ECF will accept only PDF documents. Make sure you have a PDF version of your document saved on your computer.
Step 4 - Login to CM/ECF
- Go to https://ecf.hib.uscourts.gov/
- Click on District of Hawaii - Document Filing System
- At the login screen, enter your Login and Password, and read the Important Notice of Redaction Responsibility. Check the box to confirm you understand it and click Login.
Step 5 - File Document
- After logging in to CM/ECF, select Bankruptcy or Adversary from the blue main menu bar and then select Pro Se Events.
- Enter the Case Number. Click Next.
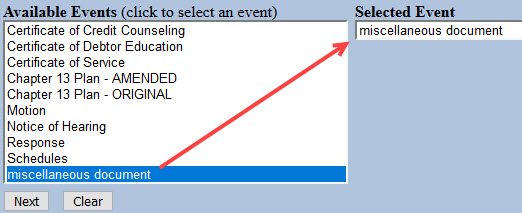
- A list of available events displays. Select miscellaneous document. It will display on the right, in the Selected Event box. Click Next.
- The next screen gives you the option to select attorneys. Do not make a selection. Click Next. Click OK at the Note that you have not selected an attorney.
- A list of case participants displays. Your name should already be listed. Select it and click Next.
- Click Choose File or Browse and attach the PDF of your document. Click Next when done.
You should always view your document to ensure you are selecting the correct one. To view it, browse to the desired PDF document and right-click the file name. Select Open and the file will open for viewing.
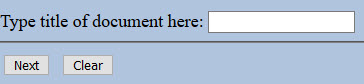
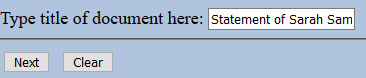
- Type the title of your document. Click Next when done.
For example, if you are filing a statement, type it in the box.
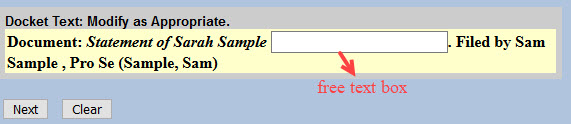
- The docket text displays, allowing additional information. If appropriate, type titles of additional documents attached in the free text box. Click Next.
- The final docket text displays. This is your final opportunity to modify your filing. Carefully review the docket entry. If you need to make a change, use your browser's back button to return to the appropriate screen. If correct, click Next to submit.

- The Notice of Electronic Filing (NEF) displays. It is confirmation of the filing in the court's database. The NEF is emailed to the registered parties in the case and includes the text of the docket entry, the unique electronic document stamp, a list of the case participants receiving e-mail notification of the filing, and a hyperlink to the document(s) filed.